
Quick answer
A lash map is a written plan for a set of lash extensions. It divides each eye into zones, inner corner to outer corner, and gives each zone a length in millimetres, often with a curl and thickness.
To create one, assess the natural lashes and eye shape, then choose a style: natural, doll eye, cat eye, squirrel or wispy. Write the lengths on a sticker over the under-eye pad, using only lengths the natural lashes can safely support.
Who this guide is for: lash techs and lash students first, with a short section for clients near the end. Alessia Simonetta, a Certified Lash Trainer lashing since 2018, teaches lash mapping in our 1-on-1 Eyelash Extension Masterclass in Woodbridge, Vaughan. If you're new to extensions, start with what lash extensions are and how they work.
What is a lash map?
A lash map is a plan that shows which extension length goes where along the lash line. Lash mapping is the process of making that plan, so the finished set has the shape you intended.
Why plan at all? The upper lid has 90 to 160 natural lashes spread over five to six rows, according to a 2018 review in the Journal of Optometry. That's far too many to plan one by one, so lash techs plan in zones.
A map keeps both eyes matching, makes refills repeatable, gives you a record for the client's file and shows the client what to expect.
Lash map vs lash style vs lash type
These three terms answer different questions.
| Term | What it describes | Example |
|---|---|---|
| Lash type | How many extensions go on each natural lash | Classic (one per natural lash), hybrid, volume, mega volume |
| Lash style | The overall shape of the finished set | Natural, doll eye, cat eye, squirrel, wispy |
| Lash map | The exact length, and often curl and thickness, for each zone | 8, 9, 10, 11, 12, 13 mm for a cat eye |
The same cat eye style can be done as a hybrid or a volume set, and the numbers change from client to client. For the application methods, see our guide to the types of lash extensions.
How to read a lash map
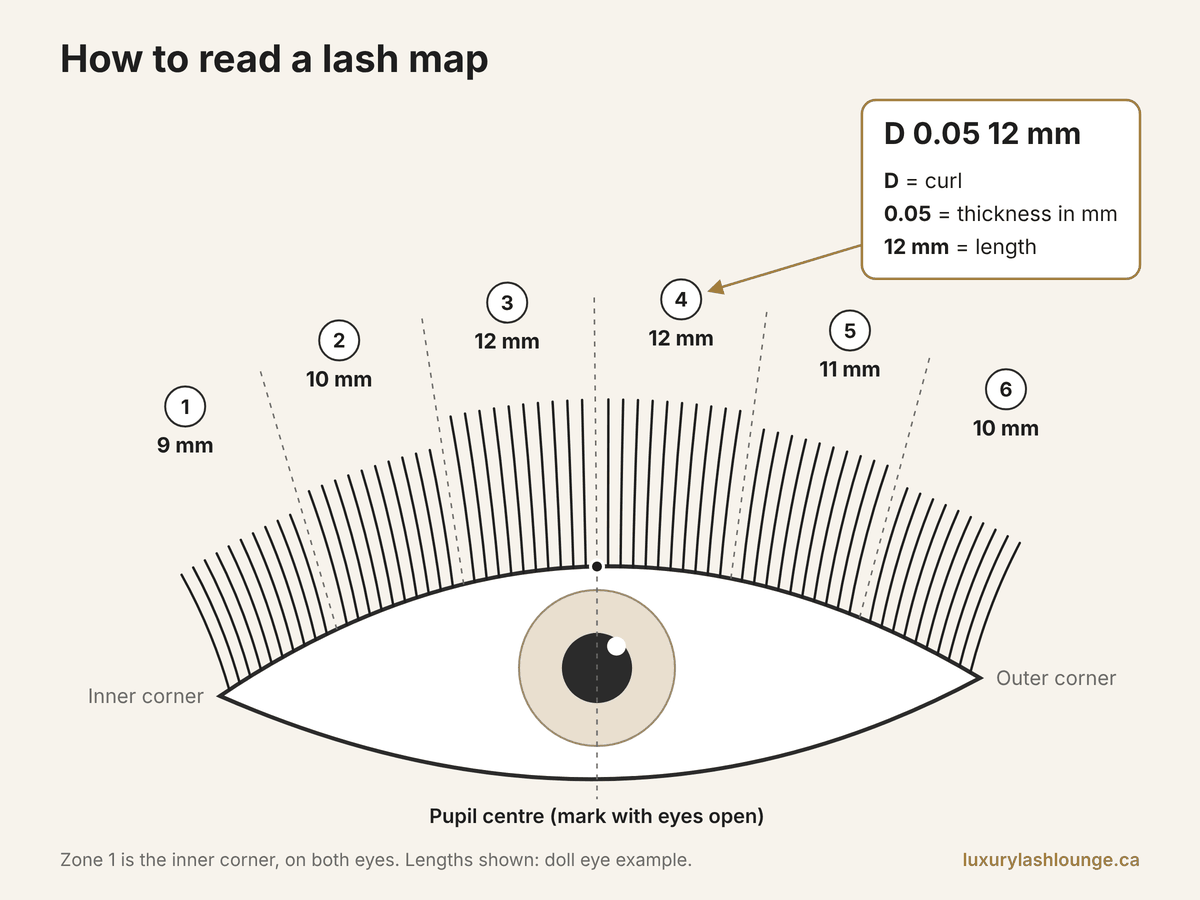
Read a lash map from the inner corner to the outer corner. Each zone shows a length in millimetres; letters and decimals, when present, give the curl and thickness.
Zones
Zone 1 is typically the inner corner, as in all our maps, and the numbers rise toward the outer corner. There's no fixed number of zones: many lash techs use 5 or 6, and some add more for detailed styles. Our example maps use 6 equal zones.
A common reference mark is the centre of the pupil, taken while the client looks straight ahead. In our diagrams it sits on the line between zones 3 and 4; on a real client, mark it rather than assume it.
Length, curl and thickness notation
A full zone label such as "D 0.05 12 mm" holds three separate choices.
| Part | Example | What it means |
|---|---|---|
| Curl | D | How strongly the extension curves. Common curls include C, CC, D and L, and exact shapes vary by manufacturer. |
| Thickness | 0.05 | The fibre's diameter in millimetres. 0.15 mm is a classic thickness; 0.05 mm and 0.03 mm are volume thicknesses. |
| Length | 12 mm | How long the extension is, from base to tip. |
The order varies: some lash techs write "12D" or "D12", and many note the curl and thickness once at the top. Tray labels use the same three details, which our lash curl chart explains in depth.
In our doll eye example, zone 4 could read "D 0.05 12 mm": D curl, 0.05 mm thick and 12 mm long.
Left eye, right eye and your point of view
Label "inner" and "outer" on every map instead of relying on left and right. Because zone 1 sits at the inner corner of both eyes, the numbers run in opposite directions across the face.
Your view flips too. Seated behind a client lying on the bed, their right eye is on your right; in a front-facing photo, it appears on the left.
How to create a lash map step by step
To create a lash map, hold a consultation, assess the natural lashes and eye shape with the eyes open, and choose a style. Then mark zones and lengths on a sticker over the gel eye pad, check that both eyes match, and record the map.
Step 1: Hold a consultation
Ask what look the client wants and how they wear their lashes day to day. Photos help, but remind clients that a photo shows someone else's natural lashes and eye shape.
Ask about previous sets: what they liked, what felt heavy and whether they've ever reacted. Our studio recommends a patch test for anyone who has had a reaction or sensitivity to lash extensions before.
If the client wears glasses, check that your longest lengths won't touch the lenses. Agree on the lash type too: our studio offers hybrid, volume and mega volume sets, and the length plan works the same way for each.
Step 2: Assess the natural lashes
Check length, density, strength and direction in each zone, and note any gaps. For scale, the Journal of Optometry review says natural lashes rarely exceed 12 mm.
Lashes are also at different stages of growth. The same review gives a growth phase of four to ten weeks and a complete cycle of four to eleven months. Lashes grow 0.12 to 0.14 mm a day.
So every zone mixes mature lashes with shorter, newer ones. Base your lengths on the healthy, mature lashes and go shorter on lashes still growing in. Straight or downward lashes typically need a stronger curl to show the length you map.
Step 3: Study the eye shape with the eyes open
Sit the client up and ask them to look straight ahead. Note where the eye is widest, where any hood falls, which way the outer corners tilt and how far apart the eyes sit.
Check both eyes, not just one. "Facial asymmetry is common in the overall population and is often presented subclinically," says a 2015 review in the Dental Press Journal of Orthodontics. Small differences are normal, so map each eye on its own and balance them with small changes in length or curl.
Step 4: Choose the style
Match the style to the client's goal, then confirm it suits their eye shape using the eye shape table further down.
| If the client wants... | Start from |
|---|---|
| A soft, everyday look | Natural |
| Bigger, rounder, more open eyes | Doll eye (open eye) |
| A lifted, elongated look | Cat eye |
| Lift without a long, heavy outer corner | Squirrel |
| A textured, spiky look | Wispy |
Step 5: Protect the lower lashes, then place the sticker
Secure the bottom lashes with gel eye pads and/or tape first. Place each pad close to the lash line but off the waterline. Then have the client close their eyes and check that no lower lashes sit above it.
Next, place a lash mapping sticker over the pad or tape. Never use a sticker on its own to secure the bottom lashes.
Health Canada requires cyanoacrylate eyelash extension adhesives to carry the caution "Ensure the eye is protected and immobilized during application" (Cosmetic Ingredient Hotlist). The American Academy of Ophthalmology's EyeWiki page on eyelash extensions also stresses proper placement of the lashes, glue and tapes.

Step 6: Mark the zones
With the pads on, ask the client to open their eyes and look straight up at the ceiling. Mark the centre of the pupil on the sticker, then the inner and outer corners.
Divide the space between the corners into zones and write a length in each one. If your sticker has fewer sections than your map has zones, split a section or write two lengths in it.
Step 7: Set lengths the natural lashes can support
Start at the style's peak and work toward each corner. Keep the change between neighbouring zones small, typically 1 or 2 mm as in our examples, so the line blends. Wispy spikes are the exception: many lash techs add them as a separate, deliberate layer.
Length adds weight. EyeWiki lists traction alopecia, the loss of natural lashes from the traction of synthetic lashes, among the complications of extensions. The AAO's eyelash extension safety page warns that rubbing, tugging or pulling can break natural lashes and even cause permanent damage to the follicle.
So on short, sparse or fine lashes, stay closer to their own length and choose a finer extension. After the first few extensions in a zone, check that the natural lashes still sit at their usual angle. If they droop or twist, go shorter or finer.
For more on lash damage and how to avoid it, see our guide to whether lash extensions ruin your lashes.
Natural lashes also protect the eye. In a model-eye study described in the Journal of Optometry review, the optimal lash length was one-third of the eye's width; long lashes pushed airflow toward the eye. It wasn't a study of extensions, but it's one more reason to keep lengths in proportion.
Step 8: Choose curl and thickness for each zone
Pick the curl once you know the lash direction. A curlier extension ends closer to its base than a straighter one of the same length, so it can look shorter.
Many lash techs use one curl throughout a set, though some soften the curl at the inner corner. Thickness follows the lash type: see the curl and thickness section below.
Step 9: Check symmetry, then record the map
Before you apply, compare the two stickers. The peaks should sit at the same point relative to each pupil, and the lengths should match unless you planned a difference.
During the set, brush through with a lash spoolie to check direction and sticking. At the end, a lash mirror shows the front of the set while the client's eyes stay closed, so you can spot gaps and crisscrossing.
Record the style, lengths, curl, thickness and fan size in the client's file. Natural lashes shed and regrow on their own cycle, so review the map at each refill. Our guide on how long lash extensions last explains why.
Five popular map styles, with examples
Many requests fit one of five lash maps: natural, doll eye (open eye), cat eye, squirrel and wispy. What separates them is where the longest lashes sit. For how each style looks once it's finished, see our guide to lash extension styles. For a fox eye map, see our guide to fox eye lash extensions.
These are examples, with lengths in mm across 6 zones from the inner corner (1) to the outer corner (6). A lash tech adjusts every map to the client's natural lashes, eye shape and lash health, and chooses curl and thickness separately.
Natural lash map
| Zone | 1 | 2 | 3 | 4 | 5 | 6 |
|---|---|---|---|---|---|---|
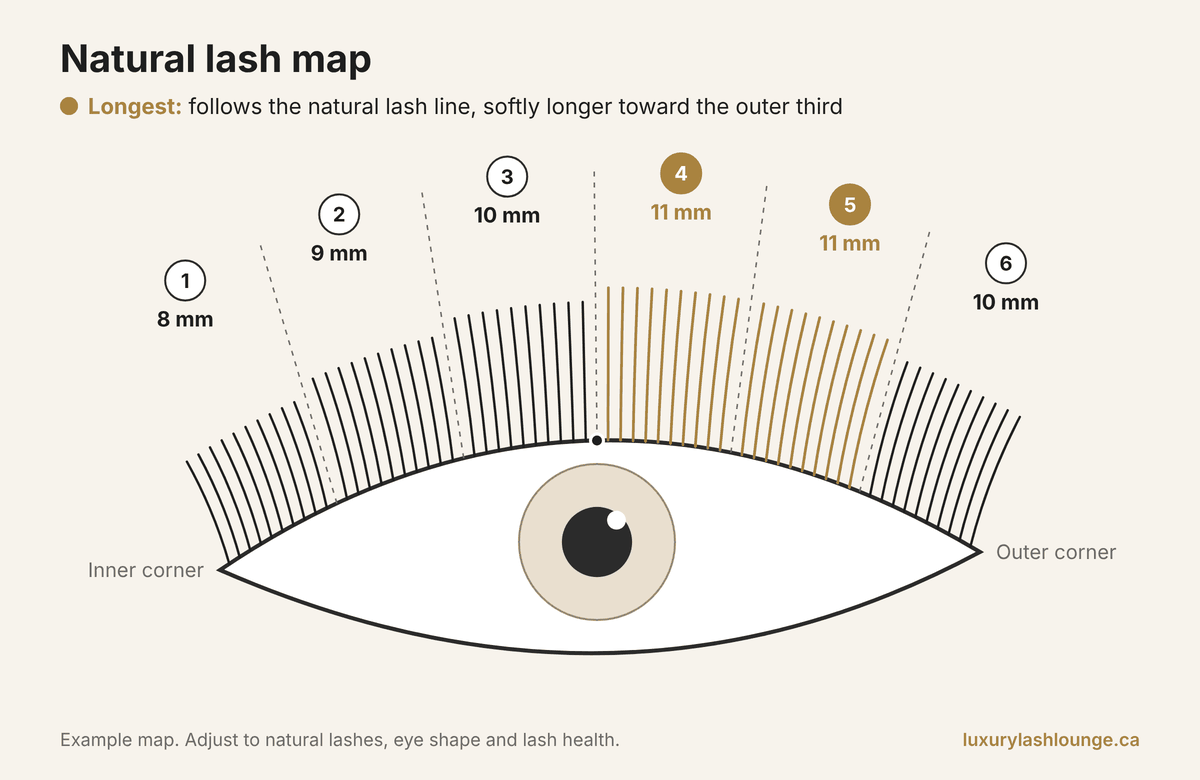
| Length (mm) | 8 | 9 | 10 | 11 | 11 | 10 |
A natural map follows the natural lash line and gets softly longer toward the outer third. It looks like a fuller version of the client's own lashes, typically suits almost every eye shape and makes a good first set.
Check where the client's own lashes are longest first. If they peak nearer the centre, move the map's peak there.
Doll eye lash map (open eye lash map)
| Zone | 1 | 2 | 3 | 4 | 5 | 6 |
|---|---|---|---|---|---|---|
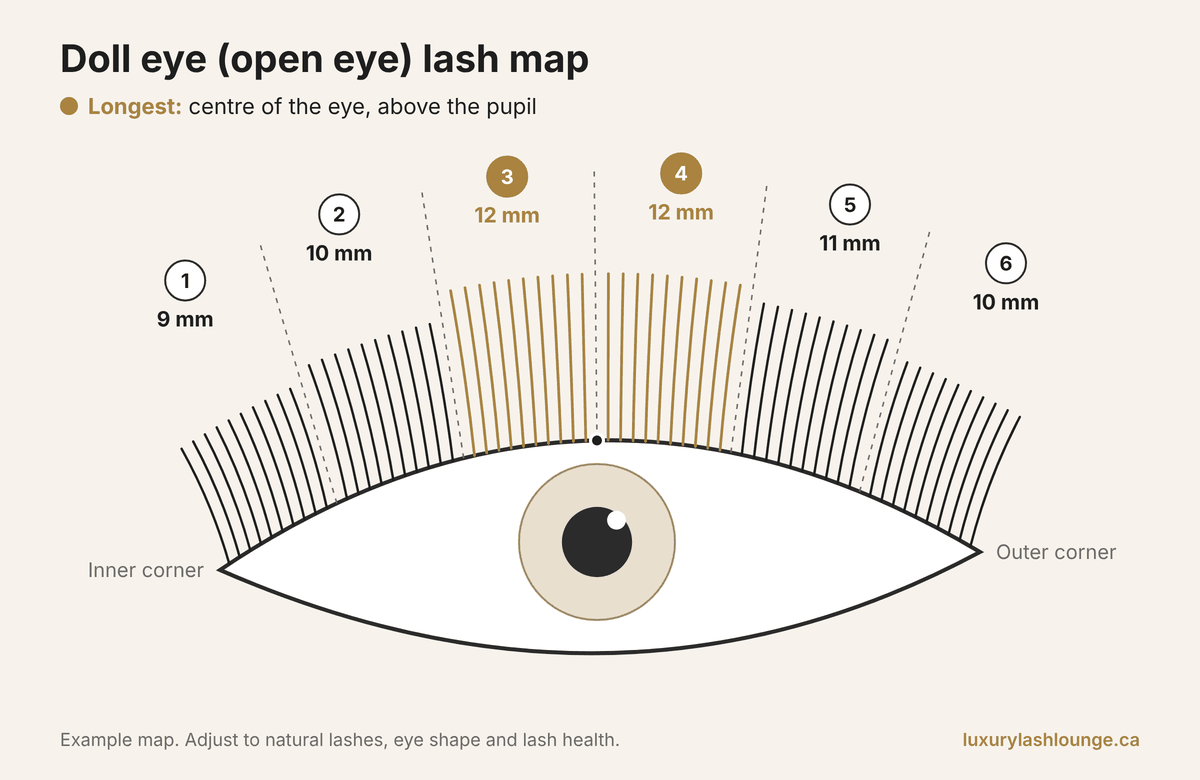
| Length (mm) | 9 | 10 | 12 | 12 | 11 | 10 |
A doll eye map, also called an open eye lash map, puts the longest lashes in the centre of the eye, above the pupil. Lash techs commonly use it to make eyes look rounder and more open.
It often suits almond, hooded, monolid, downturned and deep-set eyes, but it can make round or prominent eyes look rounder still. Line the peak up with your pupil mark, not the middle of the sticker.
Cat eye lash map
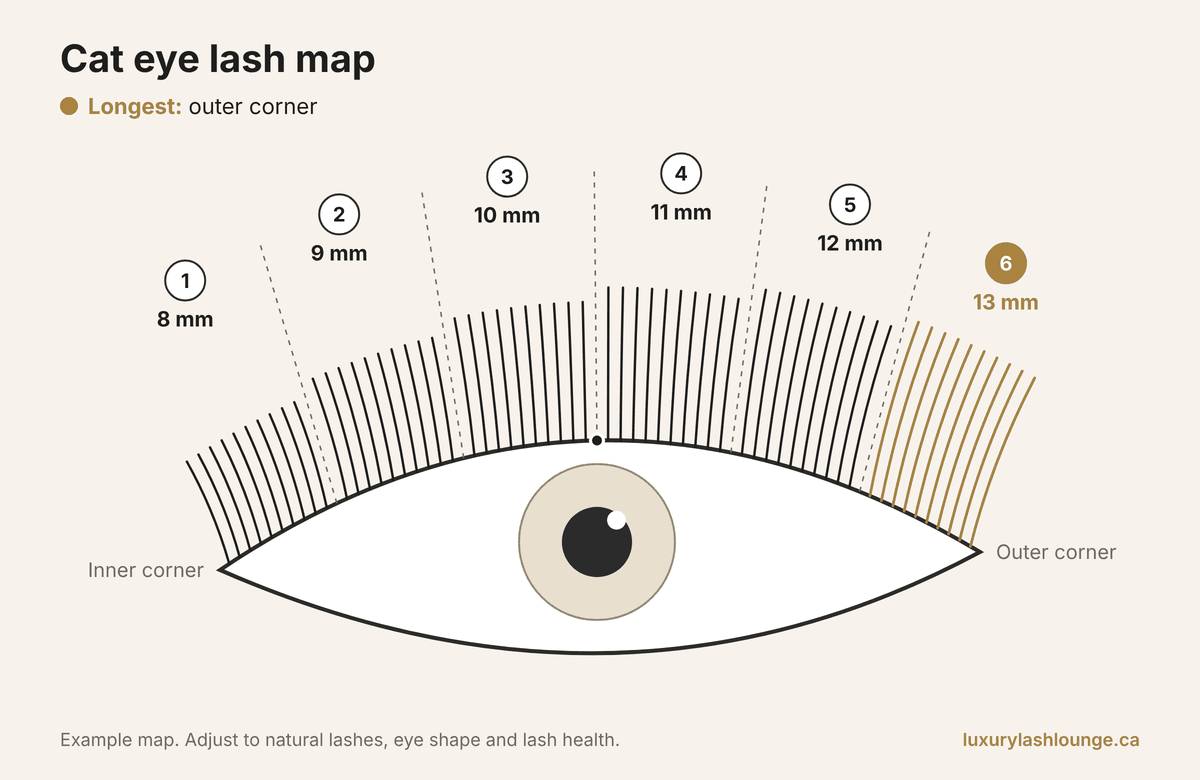
| Zone | 1 | 2 | 3 | 4 | 5 | 6 |
|---|---|---|---|---|---|---|
| Length (mm) | 8 | 9 | 10 | 11 | 12 | 13 |
A cat eye map rises steadily to its longest lashes at the outer corner. It elongates the eye, draws attention outward and up, and often flatters round, almond and close-set eyes.
On hooded or downturned eyes, a long outer corner can drop the eye, so a squirrel map often works better; on wide-set eyes it can stretch the eyes further apart, so a natural or doll eye map usually suits better. The outer corner carries the most length, so the natural lashes there need to be strong.
Squirrel lash map
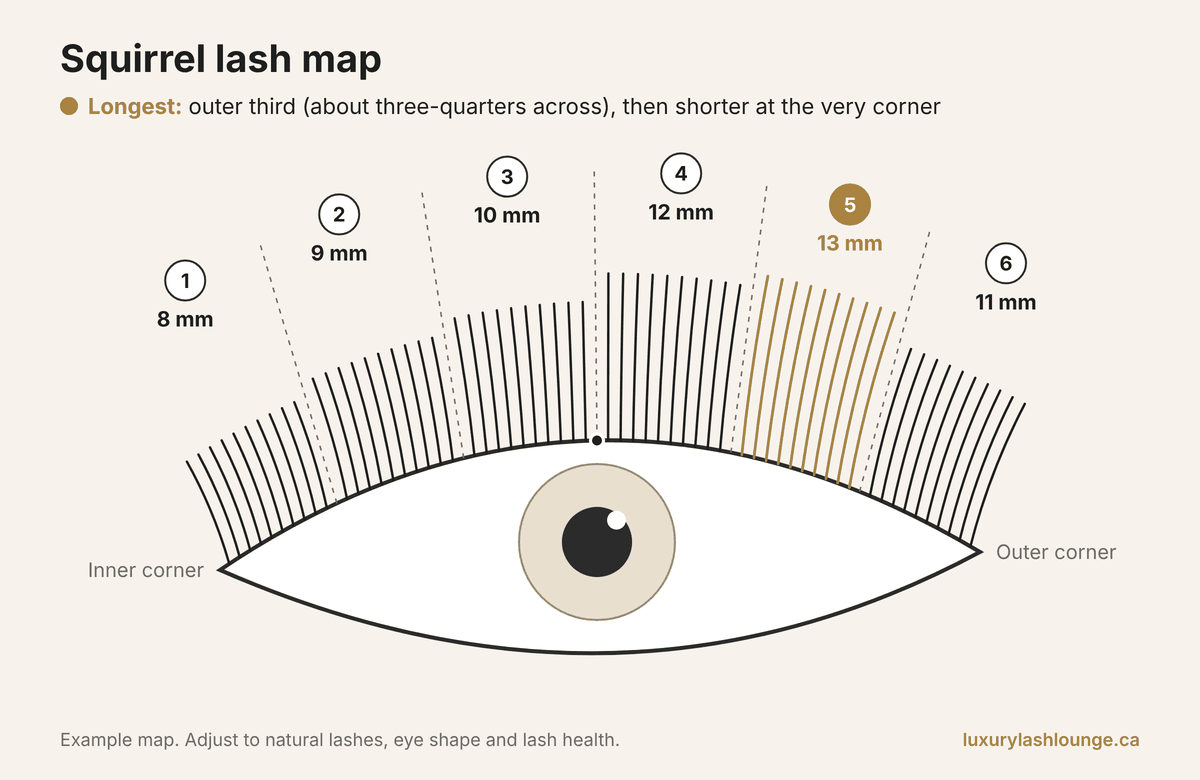
| Zone | 1 | 2 | 3 | 4 | 5 | 6 |
|---|---|---|---|---|---|---|
| Length (mm) | 8 | 9 | 10 | 12 | 13 | 11 |
A squirrel map peaks in the outer third, about three-quarters of the way across, then gets shorter at the very corner. It gives lift like a cat eye without the long, heavy outer corner.
It often suits hooded, downturned, round and close-set eyes, and clients who find a cat eye too dramatic. Compared with our cat eye example, it reaches 13 mm one zone earlier, then drops to 11 mm at the very corner.
Wispy lash map (spiky)
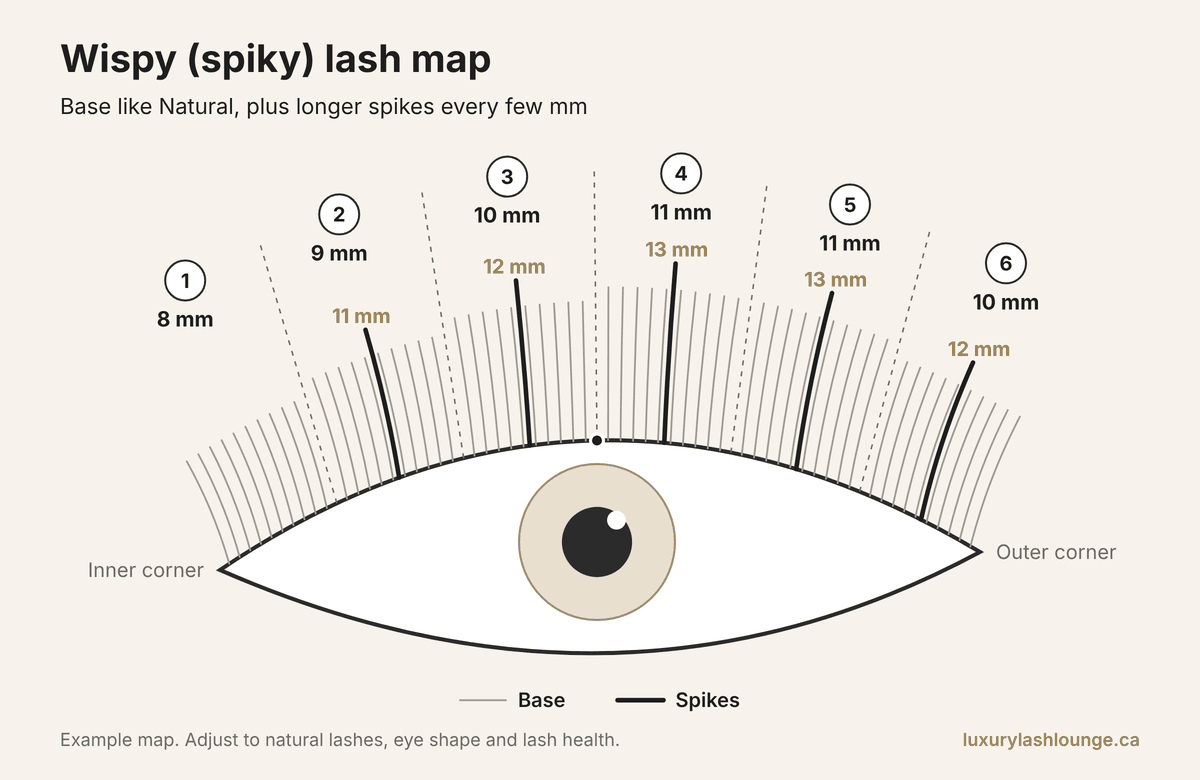
| Zone | 1 | 2 | 3 | 4 | 5 | 6 |
|---|---|---|---|---|---|---|
| Base length (mm) | 8 | 9 | 10 | 11 | 11 | 10 |
A wispy map typically has two layers: a natural base plus longer "spikes" (11, 12, 13, 13 and 12 mm in our example), placed every few millimetres along the line. In our diagram, one spike sits in each of zones 2 to 6, about 2 mm longer than the base around it.
Many lash techs make the spikes from closed, tightly wrapped fans or single classic extensions so they stand out. The base can follow another style too, such as a cat eye.
Hybrid lash map: how mixing classic and volume works
A hybrid map adds one layer to any length plan: which lashes get single classic extensions and which get handmade volume fans. Any of the five maps above can become a hybrid map.
With our trays, the classics are 0.15 mm extensions, one per natural lash, and the fans are made from finer volume lashes such as 0.05 mm. That's why we suggest keeping both 0.15 mm and 0.05 mm trays on hand for hybrid sets.
The mix varies by lash tech and by look. Common approaches:
- Spread classics and fans evenly for a fuller natural look.
- Put more fans in the zones you want densest, such as the outer zones of a cat eye.
- Make some classics slightly longer than the fans around them for a wispy hybrid.
Mark the plan on the sticker, for example "C" for classic and "3D" for a three-lash fan. A volume pick up and fanning tweezer handles the fan side of the map.
Thickness changes weight more than you might expect. As a rough calculation, for round fibres of the same material and length, weight rises with the square of the diameter, and (0.15 ÷ 0.05)² = 9.
So one 0.15 mm classic carries about nine times the fibre of one 0.05 mm extension, or about three times that of a 3D fan made from 0.05 mm lashes. Real extensions are often tapered and the calculation leaves out the glue, so treat these figures as estimates, not measured weights.
Lash maps by eye shape
To match a map to an eye shape, put length where you want lift, width or openness. Doll eye maps are commonly used to open the eye, cat eye and squirrel maps to elongate it, and natural maps typically suit almost everyone.
Treat the table as common starting points that many lash techs use, then adjust to the natural lashes.
| Eye shape | How to recognize it | Maps that typically flatter | Use with care |
|---|---|---|---|
| Almond | Wider than tall, with slightly tapered corners | Almost any map: cat eye or squirrel to lengthen, doll eye to open | Very long inner corners |
| Round | The eye looks nearly as tall as it is wide | Cat eye or squirrel to elongate | Doll eye, which adds roundness |
| Hooded | A fold of skin hangs over the crease and covers part of the lid | Doll eye or squirrel with a lifted curl | Long, dropping outer corners; soft curls that vanish under the fold |
| Monolid | No visible crease on the upper lid | Doll eye or natural with a lifted curl such as L or D | Soft curls on lashes that point down |
| Downturned | Outer corners sit lower than inner corners | Doll eye or squirrel, with the peak inside the corner | Cat eye with the longest lashes at the very corner |
| Upturned | Outer corners sit higher than inner corners | Natural or doll eye to balance; cat eye to play up the lift | Very long outer corners if the client wants a softer look |
| Close-set | Less than one eye width between the eyes | Cat eye or squirrel, with short inner corners | Long inner corners |
| Wide-set | More than one eye width between the eyes | Natural or doll eye, with a little more length toward the inner centre | An extreme cat eye, which pulls the eyes further apart visually |
| Deep-set | Eyes sit further back under the brow bone | Doll eye with enough curl (D or L) to bring lashes forward | Short, soft curls that disappear in the shadow |
| Prominent | Eyes sit forward, with more lid visible | Natural or a soft squirrel, with moderate lengths in C or CC curl | Very long, tightly curled centre lashes |
Many clients have more than one feature, such as hooded and downturned eyes. Start with the feature that changes the lash line most, often the hood.
Monolids and lash direction
An EyeWiki article on double eyelid surgery describes one eyelid type as "a single eyelid with no visible lid crease". It also notes that an epicanthal fold, a crescent of skin at the inner part of the upper lid, "encourages downturning of the eyelashes".
Downward lashes hide length, so lifted curls such as L or D are commonly used in monolid maps. Check the direction in every zone before you choose.
Close-set and wide-set eyes
The "one eye width" test comes from a proportion rule called the orbital canon: the space between the eyes equals the width of one eye. In a 2015 study in Head & Face Medicine, it held for only 25% of the women and 29% of the men measured. Treat it as a quick visual guide, not a standard.
Lash map for hooded eyes
A good lash map for hooded eyes typically peaks in the centre or three-quarters across, like a doll eye or squirrel map, with an L or D curl. Keep the very outer corner shorter, so the hood doesn't push it down.
What makes an eye hooded
With hooded eyes, a fold of skin below the brow hangs over the crease and can cover part of the lash line. One cause is dermatochalasis, which EyeWiki describes as loose and redundant eyelid skin and a common sign of aging around the eyes. It lists genetics and family history as the strongest risk factors.
Hooding can affect vision too. EyeWiki notes that drooping tissue, classically called lateral hooding, can reduce side vision. If a client's hood gets in the way of their sight, suggest they see an eye doctor.
How to map hooded eyes
- Map with the client sitting up, eyes open, and note how much of each zone the hood covers.
- Many lash techs choose a lifted curl such as L or D, because a soft C curl can disappear under the fold.
- Put the peak where the hood is lightest: the centre (doll eye: 9, 10, 12, 12, 11, 10 mm) or about three-quarters across (squirrel: 8, 9, 10, 12, 13, 11 mm).
- Keep the outer corner shorter than the peak, so the hood can't press it down.
- Check again with the eyes open at the end. If lashes vanish under the fold, add curl before you add length.
Our mixed length trays come in L curl as well as C, CC and D, in 8 to 15 mm.
Choosing curl and thickness for your map
Choose the curl from the natural lash direction and the look you want, and the thickness from the lash type and natural lash strength. Decide length, curl and thickness together for each zone.
Alessia's view: D curl is the most popular curl with lash techs, a universal curl that looks good on everyone, while C curl gives a more natural look. Curl names and exact shapes vary by manufacturer, and our lash curl chart guide covers every option in detail.
Lash mapping tools
To map a set, you need lower-lash protection, something to write on, trays in the right lengths and tools to check your work. Our prices are in CAD, and more options are in our lash extension tools collection.
| Tool | Role in mapping | Our version |
|---|---|---|
| Gel eye pads | Cover the lower lashes and hold your sticker | $20 for 50 pairs; lint free and hypoallergenic |
| Pink lash tape | Holds down stray lower lashes | $2.99 for a 900 cm roll, 1.2 cm wide; latex-free, leaves no residue |
| Mapping stickers | Pre-printed sections to write the map on | $0.99 a sheet of 7 pairs |
| Mixed length trays | Every length from 8 to 15 mm on one tray | $15, or $17 for 0.03 mm and L curl; 16 rows, 2 of each length |
| Single length volume trays | One length per tray, all 0.05 mm | $15; C curl 8 to 12 mm, D curl 9 to 19 mm |
| Lash spoolies | Brush through to check direction and sticking | From $4.99 for 50 |
| Lash mirror | Shows the front of the set with the eyes closed | $19.99; 14 cm stainless steel, gold or silver |
Single vs mixed length trays for mapping
Mixed length trays put every length within reach. All five example maps use 8 to 13 mm, so one mixed tray covers each of them. Compare every option in our lash extension trays collection.
Single length trays let you restock only your most-used lengths. Ours start at 9 mm in D curl and stop at 12 mm in C curl. For an 8 mm D curl inner corner or a 13 mm C curl peak, use a mixed tray.
Practise mapping before you work on clients
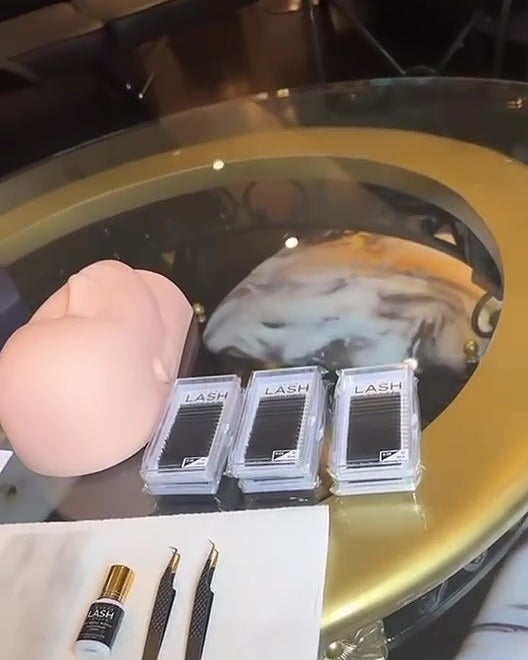
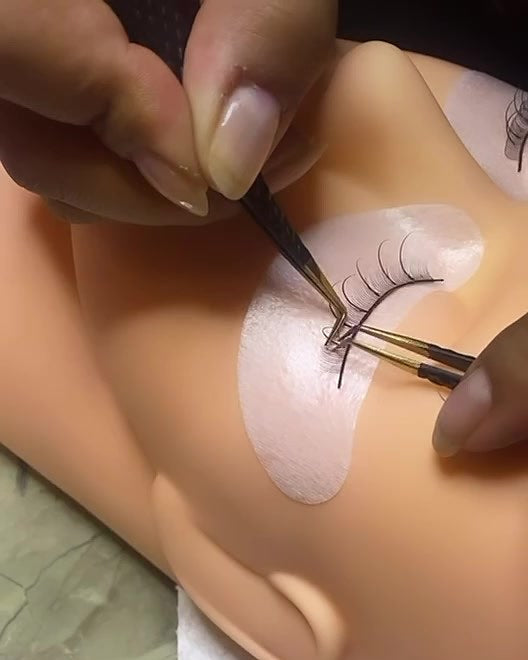
A mannequin head with practice strip lashes lets you practise each map, with pads and stickers placed as on a client. Our lash extension kits bundle trays, pads and tools, and the large kits include a mannequin head.
Hygiene: single-use vs reusable
Use fresh pads, tape, stickers and spoolies for each client. Reusable tools, such as tweezers and the lash mirror, are different.
York Region Public Health's fact sheet for makeup, eyelash and eyebrow services says reusable instruments and equipment are to be cleaned and disinfected after each use.
Common lash mapping mistakes and how to fix them
Many mapping mistakes come from planning with the eyes closed, copying a map that doesn't fit, or choosing lengths the natural lashes can't support.
| Mistake | What you see | Fix |
|---|---|---|
| Mapping with the eyes closed only | The peak lands off-centre, or the hood hides the length | Mark the pupil and check the hood with the eyes open |
| Copying a map from a photo | The shape doesn't suit, or lengths are too long | Use the photo for the look; set lengths from the natural lashes |
| Lengths the natural lashes can't support | Lashes droop or twist, with a risk of lash damage | Go shorter or finer in that zone |
| Big jumps between zones | A choppy, stepped lash line | Keep changes small, typically 1 or 2 mm, except planned wispy spikes |
| Long outer corners on hooded or downturned eyes | The eye looks droopy or tired | Move the peak inward with a doll eye or squirrel map |
| Long inner corners | A heavy, crowded inner corner that can make eyes look closer-set | Keep zone 1 the shortest |
| Ignoring uneven eyes | One eye looks bigger or more lifted | Map each eye on its own, then compare |
| Wrong curl for the lash direction | Lashes point down or look shorter than mapped | Check direction first; try L or D curl |
| Using the sticker as the only barrier | Lower lashes aren't secured | Pads and/or tape first, sticker on top |
| Not recording the map | Refills don't match the original set | Note style, lengths, curl, thickness and fan size |
| Never checking from the front | Gaps, crisscrossing or an uneven shape | Brush through with a spoolie; check with a lash mirror |
Lash map cheat sheet
Here are all five example maps in one table, with lengths in mm from the inner corner (1) to the outer corner (6). They're starting points: adjust every map to the client's natural lashes, eye shape and lash health.
| Style | 1 | 2 | 3 | 4 | 5 | 6 | Longest lashes | Often suits |
|---|---|---|---|---|---|---|---|---|
| Natural | 8 | 9 | 10 | 11 | 11 | 10 | Follows the natural lash line, softly longer toward the outer third | Almost every eye shape; first sets |
| Doll eye (open eye) | 9 | 10 | 12 | 12 | 11 | 10 | Centre of the eye, above the pupil | Almond, hooded, monolid, downturned, deep-set |
| Cat eye | 8 | 9 | 10 | 11 | 12 | 13 | Outer corner | Round, almond, close-set |
| Squirrel | 8 | 9 | 10 | 12 | 13 | 11 | Outer third (about three-quarters across), then shorter at the very corner | Hooded, downturned, round, close-set |
| Wispy (spiky) | 8 | 9 | 10 | 11 | 11 | 10 | Base like Natural, plus longer spikes of 11, 12, 13, 13 and 12 mm placed every few mm | Clients who want texture |
For a hybrid set, keep any row above and mark which lashes get 0.15 mm classics and which get 0.05 mm fans.
For clients: what to ask at your appointment
You don't need to know any map numbers before your appointment. Tell your lash tech the look you want, show a photo or two, and let them check your natural lashes and suggest a map.
Questions worth asking:
- Which style suits my eye shape, and why?
- What lengths will you use, and can my natural lashes support them?
- Will you note my map so my refills match?
- Should I have a patch test first?
The AAO suggests asking for the glue's ingredient list and checking it for allergens. Lash adhesive is for trained professionals: Health Canada's Cosmetic Ingredient Hotlist says cyanoacrylate eyelash extension adhesives must be sold for professional use only. Never try a DIY set with professional glue.
If your eyes become itchy, red, painful or swollen after a set, or your vision changes, don't remove the extensions yourself. The AAO advises seeing an ophthalmologist immediately, and your doctor, optometrist or pharmacist can also advise you.
At our studio, full sets are $120 for hybrid, $135 for volume and $150 for mega volume, before HST; we don't offer classic sets. A $20 patch test takes about 15 minutes and is recommended if you've reacted to lash extensions before. Itching, stinging, burning or swelling within 24 hours of it may mean a sensitivity or allergy.
See lash extensions in Woodbridge for refills and details, or book an appointment. Read how much lash extensions cost in Ontario to compare prices, and our lash extension aftercare guide for daily care.
Frequently asked questions
What is a good lash map?
A good map suits the client's eye shape, uses lengths their natural lashes can support, and changes gradually between zones so the line looks smooth. It matches on both eyes, allowing for natural differences, and is recorded so refills stay consistent. A dramatic map that overloads weak natural lashes is not a good map.
How do I find out my lash map?
You don't need to work it out yourself. Your lash tech checks your eye shape with your eyes open, looks at your natural lashes and asks what look you want, then writes the map. Ask them to note it in your client file, so you can request the same set, or a small change, next time.
How do I read a lash map?
Read it from the inner corner (zone 1) to the outer corner. Each number is a length in millimetres, and a label such as "D 0.05 12 mm" adds the curl and thickness. Longest numbers in the centre mean a doll eye, at the outer corner a cat eye, and three-quarters across with a shorter corner a squirrel.
What does lash mapping mean?
Lash mapping means planning a set of lash extensions before you apply them. The lash tech divides the lash line into zones, then sets the length, curl and thickness for each to suit the natural lashes, eye shape and style. The plan, usually written on a sticker over the under-eye pad, keeps the set even and repeatable.
How many zones does a lash map have?
There's no fixed number. Many lash techs use 5 or 6 zones per eye, and some add more for detailed styles such as wispy sets. Our example maps use 6 equal zones, from zone 1 at the inner corner to zone 6 at the outer corner.
Can you lash map without stickers?
Yes: many lash techs write the zones and lengths straight onto the gel eye pad or tape. Mapping stickers can be quicker and neater because the sections are pre-printed. They always go on top of pads or tape and should never be used alone to secure the lower lashes.
Which lash map makes eyes look bigger?
A doll eye map, also called an open eye lash map, is the one many lash techs choose, because the longest lashes sit in the centre above the pupil. Our example is 9, 10, 12, 12, 11 and 10 mm, often with a lifted curl such as D. On round or prominent eyes it can look too round, so a squirrel map may suit better.
Which lash map suits hooded eyes?
Hooded eyes typically suit a doll eye or squirrel map with a lifted curl such as L or D. Keep the outer corner shorter than the peak, and map with the eyes open to see where the fold sits. If excess eyelid skin affects your vision, see an eye doctor.
What's the difference between cat eye and squirrel maps?
A cat eye keeps getting longer all the way to the outer corner, ending at 13 mm in our example. A squirrel map peaks about three-quarters across, then drops from 13 mm to 11 mm at the very corner. That softer finish often suits hooded or downturned eyes better.
Where can I learn lash mapping?
Lash styling and mapping are part of our 1-on-1 Eyelash Extension Masterclass ($1,200) in Woodbridge, which includes the Large Lash Training Kit and our training manual. Certified lash techs can focus on mapping in the customized Lash Refresher ($550), and our printed Eyelash Extension Training Manual covers it too. See also how to become a lash tech in Ontario.
About the author
Alessia Simonetta is the owner, master lash artist and certified lash trainer at Luxury Lash Lounge in Woodbridge (Vaughan), Ontario. She has been lashing since 2018 and holds 5 certifications: Classic Lash Artist, Hybrid Lash Artist, Volume Lash Artist, Mega Volume Artist and Certified Lash Trainer. She has worked with thousands of lash clients and trained hundreds of students.
Learn mapping with her in 1-on-1 lash training, or book lash extensions at the studio.
Sources
- Health Canada. Cosmetic Ingredient Hotlist (prohibited and restricted cosmetic ingredients; cyanoacrylate entry; page modified 2025-08-13). https://www.canada.ca/en/health-canada/services/consumer-product-safety/cosmetics/cosmetic-ingredient-hotlist-prohibited-restricted-ingredients/hotlist.html
- Aumond S, Bitton E. The eyelash follicle features and anomalies: A review. Journal of Optometry. 2018;11(4):211-222. https://pmc.ncbi.nlm.nih.gov/articles/PMC6147748/
- Thiesen G, Gribel BF, Freitas MPM. Facial asymmetry: a current review. Dental Press Journal of Orthodontics. 2015;20(6):110-125 (DOAJ record). https://doaj.org/article/76e909b36c2d4c379ef02ac56eb3b3cc
- EyeWiki, American Academy of Ophthalmology. Eyelash Extensions. https://eyewiki.aao.org/Eyelash_Extensions
- American Academy of Ophthalmology (Mukamal R; reviewed by Taylor RJ). Eyelash Extension Facts and Safety. 2018. https://www.aao.org/eye-health/tips-prevention/eyelash-extension-facts-safety
- EyeWiki, American Academy of Ophthalmology. Asian Blepharoplasty (Double Eyelid Procedure). https://eyewiki.aao.org/Asian_Blepharoplasty_%28Double_Eyelid_Procedure%29
- Al-Sebaei MO. The validity of three neo-classical facial canons in young adults originating from the Arabian Peninsula. Head & Face Medicine. 2015;11:4. https://pmc.ncbi.nlm.nih.gov/articles/PMC4369102/
- EyeWiki, American Academy of Ophthalmology. Dermatochalasis. https://eyewiki.aao.org/Dermatochalasis
- York Region Public Health. Makeup application, eyelashes and eyebrows (infection prevention fact sheet). https://www.york.ca/resource/makeup-application